- Home
- Newsletters
- April 2026 CCTM Newsletter
- February 2026 Newsletter
- November 2025 CCTM Newsletter
- September 2025 CCTM Newsletter
- April 2025 CCTM Newsletter
- February 2025 Newsletter
- January 2025 Board Best Of
- November 2024 CCTM Newsletter
- September 2024 CCTM Newsletter
- April 2024 CCTM Newsletter
- February 2024 CCTM Newsletter
- Newsletter Archive
- Conferences and Events
- CCTM Partners
- CMT Journal
- About CCTM
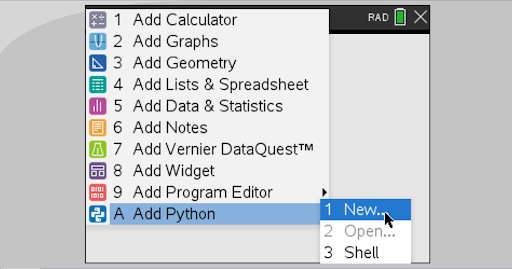
Pong on a Calculator: An introduction to Python on the TI-NspireBy Jen Moriarty, CCTM Tech Specialist Looking for a fun differentiation project? Interested in exploring the intersection of math and programming with your students? TI’s Nspire CX calculators are the perfect tool for bringing coding lessons that can expose students to actual Python programming in an accessible and straightforward development environment- without having to deal with the distractions of AI or the internet at large. Step 1: Get a Ball to Appear
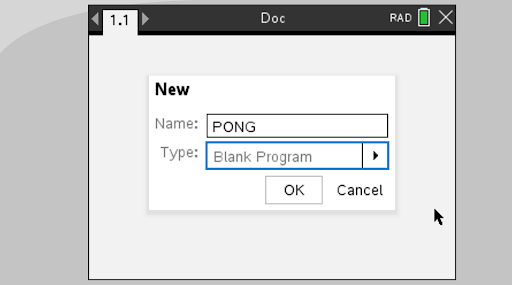
A new window will pop up. Name it “PONG” and keep the default “Blank Program” selected, then press OK.
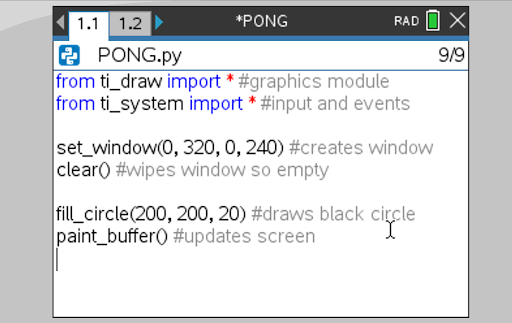
Here’s the first few lines of code for our program.
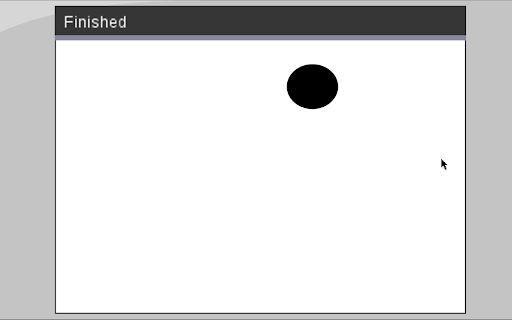
The first two lines bring in important modules, which are files of pre-written code. These two in particular help us draw graphics and obtain user input. In the world of software engineering, very few programs are ever written entirely from scratch! Next we have a series of function calls, some containing a number of arguments in their parenthesis. Run the code to see what these do by pressing menu->run (or control+r if using the student software).
I like to let my students explore here for a bit. Have them experiment with different numbers in the parenthesis (I recommend only changing one at a time!) until they are able to explain a number of concepts. How do these arguments in the set_window function impact the shape and size of the game screen? How do the numbers in the fill_circle function impact its position and size? Where is the origin of the game screen located? Students might also notice here that functions in programming are a bit different than functions in their math classrooms. Introducing functions like set_window, clear, fill_circle, and paint_buffer can allow opportunities for some wonderings and discussions on their similarities and differences. Now let’s add a game loop and a few other things. Here’s what this looks like: 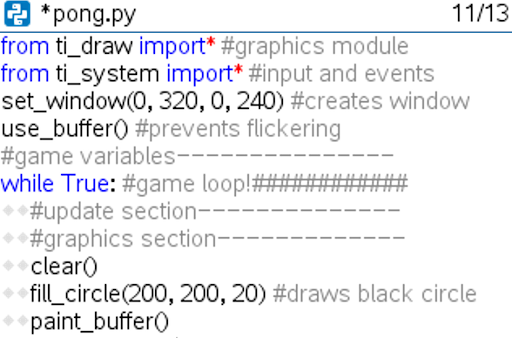 Notice that all of the code inside the while loop has been shifted over. This is really important! In Python, loops know what code to repeat by the spaces in front of the code. We’ve also added some comments here so it will be easier to know where future lines should be placed. Like whitespace, code order also impacts how a program will run! This program contains an infinite loop. To exit the code after testing, hold the “on” button for a couple seconds (or F12 if you’re in the student software). We will fix this later! Step 2: Moving the BallThis won’t be a very interesting game if our ball never moves; to allow this to happen we now need to introduce a few variables. Alter your code above your game loop so it looks like this: 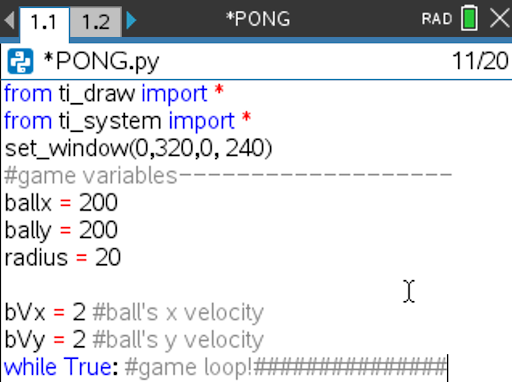
Then, change the inside of your game loop so it updates the ball’s variables, and uses them to draw the ball at a new location each iteration of the game loop. Note: you do NOT need a second while loop here; this was included so you can see where this new code goes!  Test your code. You should have a ball that moves off the screen! Let’s fix that by adding some boundary checks to the walls of our game screen. Here’s what this looks like- this code goes in your update section of your game loop (don’t forget to indent!)
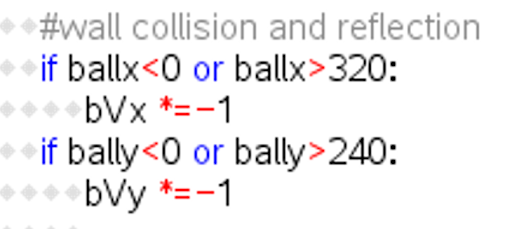 Usually I only give students ONE of these two if statements, and ask them to create the second on their own. Another task for students: right now the circle doesn’t bounce off the walls until it’s about halfway through... how could we alter these statements to tighten this collision so it bounces once the circle’s edge hits the boundary? You might notice that our ball is going really fast. Usually in games we add a timer to control game speed (known as FPS- Frames Per Second). We can approximate this by adding in a small pause to our game loop. To do this, add this line with the other imports at the top:Then you can add a small pause with the following line, anywhere in your game loop:
Step 3: Adding a PaddleOk, so now let's draw a paddle. First, we’ll set up some variables to hold important information about the paddle above the game loop:
Next, we’ll get it drawn in the render section:
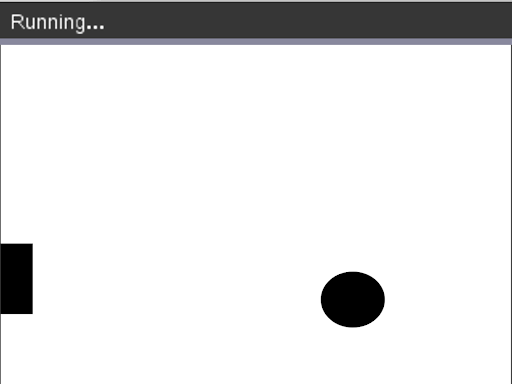
It won’t move yet, but you should have a paddle appearing!
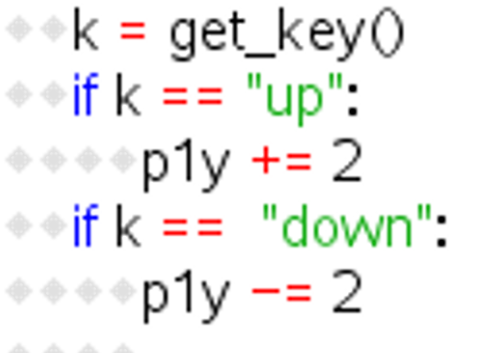
Once this works, we can add some simple keyboard input to move the paddle. This code goes in your update section:
Your paddle should now move- painfully slow- by pressing the up and down buttons in on the calculator. Definitely adjust the speed here! Now that we’ve introduced user input, it’s a great time to finally get our game loop to be escapable! We’ll do this by creating a variable that controls the game loop that can be triggered by a key press. The code to do this looks like this (remember, you already have the while loop, so you don’t need that again!) 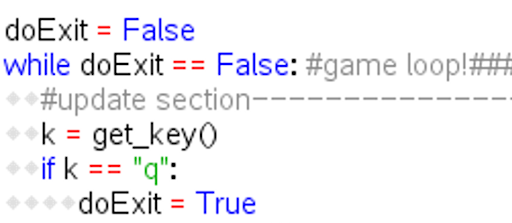 The rest of the if statements we coded before this step can follow below this code.
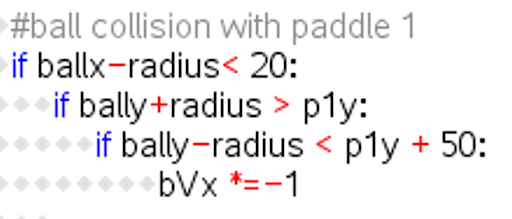
Step 4: Ball/Paddle CollisionThe code below checks three things: is the left edge of the ball past the right edge of the paddle, is the bottom of the ball below the top of the paddle, and is the top of the ball above the bottom edge of the paddle. This code can go in your update section.
Step 5: Adding a Second PaddleI usually leave most of this step for students to work out by themselves. If they need hints, we’ll sometimes talk through the steps they think they need. This usually looks something like this:
The rough pseudocode for adding AI sounds something like this: If the ball is above the second paddle, move the paddle up, if the ball is below the second paddle, move the paddle down. 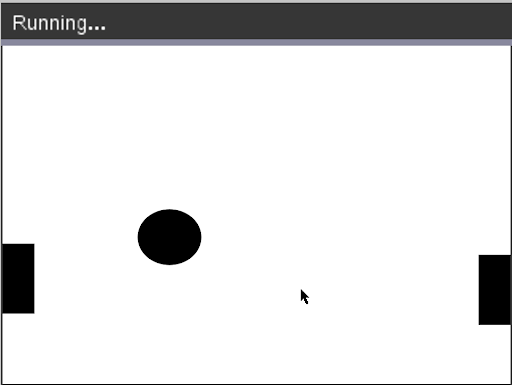 Step 6: Adding a ScoreboardThis isn’t normally how PONG is scored, but to keep things simple, we’ll give each player a point when they successfully hit the ball instead of when the other player misses. First, you’ll want to create two new variables above your game loop and initialize them to 0. I named mine p1Score and p2Score. Next, you’ll want to increase each player’s score when they successfully ricochet the ball off their paddle. Finally, add this code to the render section to get the scores to appear at the bottom of the screen:
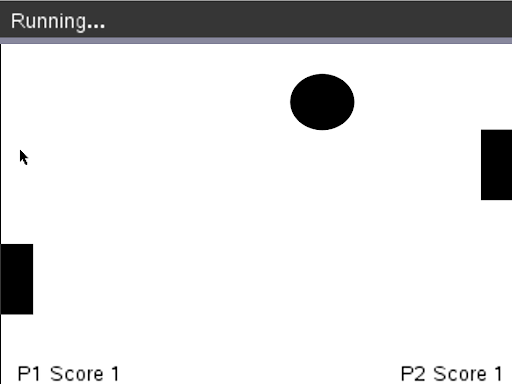 And that’s it! I find PONG is a fun entry point to programming, as it covers a lot of the essentials while also producing something playable in under 100 lines of code. It even has some room for extensions- you might challenge your students to change colors with the set_color function, change the scoring system to work a bit more like the original game, or even start expanding this into more complicated games like Breakout or Asteroids! Here’s the code in its entirety for teachers to use as needed: #PONG in Python for TI Nspire Calculator
from ti_draw import *
from ti_system import *
from time import sleep
set_window(0, 320, 0, 240) #create tame window
use_buffer()
#game variables-------------------
ballx = 200
bally = 200
radius = 20
bVx = 5 #ball's x velocity
bVy = 5 #ball's y velocity
p1y = 50 #paddle 1's y position
p2y = 50 #paddle 2's y position
p1Score = 0
p2Score = 0
doExit = False
while doExit == False: #game loop!###############
#update section-----------------
k = get_key()
if k == "q":
doExit = True #kill game loop if q is pressed!
if k == "up":
p1y += 5
if k == "down":
p1y -= 5
ballx += bVx
bally += bVy
#p2 "AI"
#move down if ball is below paddle
if bally-radius > p2y+50:
p2y += 8
#move up if the ball is above the paddle
if bally+radius < p2y:
p2y -= 8
#wall collision and reflection
if ballx<0 or ballx>320:
bVx *=-1
if bally<0 or bally>240:
bVy *=-1
#ball collision with paddle 1
if ballx-radius< 20:
if bally+radius > p1y:
if bally-radius < p1y + 50:
bVx *=-1
p1Score += 1
#ball collision with paddle 2
if ballx+radius>300:
if bally+radius > p2y:
if bally - radius<p2y + 50:
bVx *= -1
p2Score +=1
#graphics section----------------
clear() #wipe screen clear each time
fill_circle(ballx, bally, radius) #draw ball
fill_rect(0, p1y, 20, 50) #draw left paddle
fill_rect(300, p2y, 20, 50) #draw right paddle
draw_text(10, 0, "P1 Score " + str(p1Score))
draw_text(250, 0, "P2 Score " + str(p2Score))
paint_buffer() #render all graphics to screen
sleep(0.03) #control speed of game loop
|